GPG 入门教程
简介和概念
完整的官方文档可在 官网 阅读。
GNU Privacy Guard(GnuPG 或 GPG)是一个密码学软件,用于加密、签名通信内容及管理非对称密码学的密钥。GnuPG 是自由软件,遵循 IETF 订定的 OpenPGP 技术标准设计,并与 PGP 保持兼容。
GPG 有许多用途,包括文件和邮件加密、签名、Git 提交签名等。
. GitHub Docs. [2022-06-06]. (原始内容[存档](https://web.archive.org/web/20220606095245/https://docs.github.com/en/authentication/managing-commit-signature-verification/about-commit-signature-verification)于2022-06-06)">[1]</span></a></sup>](https://picture.zhanganzhi.com/2022/06/19/2hq6kjy.png)
以下概念建议先浏览一遍,操作后再回来看一遍,可以更好理解。
主密钥(Primary Key)和子密钥(Subkey)
类似证书的根证书结构,GPG 密钥分为主密钥和子密钥。
. 知乎. 2020-05-02 [2022-06-06]. (原始内容[存档](https://web.archive.org/save/https://zhuanlan.zhihu.com/p/137801979)于2022-06-06)">[5]</span></a></sup>](https://picture.zhanganzhi.com/2022/06/19/jgoxt42.png)
子密钥虽然有自己的公钥,但是实际使用导出的是一组公钥,发布这一个公钥即可认证所有子密钥。所有的变更都是通过这个公钥发布的,比如 UID 的更改、子密钥的新增或撤销等。
密钥类型
共有四种类型的密钥,对应的缩写[8]如下:
| 类型 | 全名 | 缩写 |
|---|---|---|
| 主公钥 | Public Key | pub |
| 子公钥 | Public Subkey | sub |
| 主私钥 | Secret Key | sec |
| 子私钥 | Secret Subkey | ssb |
用途(Usage)
每个密钥可以用不同的用途,下表是不同用途的含义:
| 缩写 | 全名 | 用途 |
|---|---|---|
| C | Certificating | 认证,如子密钥或证书,类似根证书的作用。 |
| S | Signing | 签名,如文件数字签名、邮件签名、Git 提交。 |
| A | Authenticating | 身份验证,如登录。 |
| E | Encrypting | 加密,如文件和文本。 |
具有 C 的密钥是主密钥,只有这个密钥可以用于:
- 添加或撤销子密钥的用途
- 添加、更改或撤销密钥关联的身份(UID)
- 添加或更改本身或其他子密钥的到期时间
- 为了网络信任目的为其它密钥签名[7]
用户 ID(User ID)
用户 ID 用于将密钥和真人关联,可以有多个 UID,一般为以下格式:
1 | |
如果使用多个身份,比如个人邮箱、 GitHub 账号、公司邮箱[6],可以设置为这样:
1 | |
需要注意公钥会包含电子邮件地址,注意隐私和垃圾邮件问题。
密钥 ID(Key ID)
每一个密钥 ID(Key ID)有三种形式,指定密钥的最好方式就是使用指纹,可以最大限度避免重复的 ID:
- 指纹:证书的 SHA-1 哈希,20 字节;
- 长 ID:指纹的最后 16 位,8 字节;
- 短 ID:指纹的最后 8 位,4 字节;
过期(Expire)和撤销(Revoke)
GPG 密钥可以设置过期时间,可以是永久有效。很多人会给主密钥设置长期有效,对不同用途的子密钥设置较短的期限。
GPG 可以发布撤销证书,发布撤销证书后,其他人收到后就知道之前发布的密钥失效了。
安装 GPG
如果安装了 Git,可直接使用 Git Bash。
也可以到 官网 下载安装。
生成密钥
1 | |
选择加密类型,推荐 RSA 4096。
1 | |
设置过期时间,0 为永久。
1 | |
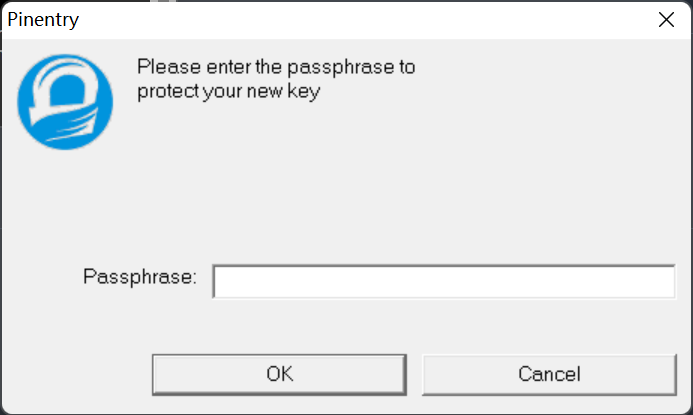
根据提示输入姓名和邮箱,Comment 留空即可,然后设置密钥的密码。密码用于对称加密本地存储的私钥,在文件泄露的情况下也能保护你的密钥,在使用 GPG 密钥时经常需要输入密码以验证身份。
1 | |
同时会自动生成一个用途为 E 的子密钥,生成的密钥将会列出。
1 | |
生成子密钥
在日常使用中,应当避免使用主密钥,而是为不同用途使用不同的子密钥。[8]
进入密钥的编辑,参数为上一步输出的密钥指纹。加上 --expert 参数以在下一步使用 Curve 25519 算法生成子密钥[9],这是一种安全性介于 RSA 2048 和 RSA 4096 之间的算法,且速度更快。
1 | |
使用 addkey 添加子密钥,根据提示选择、输入密码、保存更改。
注意不同用途的子密钥可能需要选择不同的加密方式。
1 | |
在弹出的对话框输入密码。生成完成后保存。
1 | |
撤销证书
默认情况下生成密钥后会在用户文件夹内的 .gnupg\openpgp-revocs.d 生成一份撤销证书,也可以使用 gpg --output revoke.asc --gen-revoke mykey 生成一份。
管理密钥
列出密钥
使用 gpg --list-keys 即可列出本地所有公钥和子公钥,还有一个简便写法:gpg -k。
私钥类似,gpg --list-secret-keys 和 gpg -K。
我们在本地使用时,长 ID 和短 ID 更方便,使用 --keyid-format {none|short|0xshort|long|0xlong} 即可输出长 ID 或短 ID:
1 | |
1 | |
默认情况下会输出连续的 20 字节指纹,例如 5DE3E0509C47EA3CF04A42D34AEE18F83AFDEB23。使用 --fingerprint 参数可输出有空格分隔的指纹,例如 5DE3 E050 9C47 EA3C F04A 42D3 4AEE 18F8 3AFD EB23。
以上两个参数可以在配置文件 ~/.gnupg/gpg.conf 中添加以避免重复输入,文件需要手动创建。
1 | |
导入和导出
使用 gpg --import key.gpg 导入密钥,后面会提到导入 GitHub 的公钥。
通过以下命令查看使用 ASCII-armored 格式的公钥:
1 | |
增加 --output 参数以导出到文件:
1 | |
导出私钥,需要输入密码:
1 | |
建议将导出的公私钥和撤销证书做好备份。
修改用户 ID(UID)
进入编辑密钥,然后修改 UID,可以添加、设置主 UID、撤销和删除。
1 | |
Git & GitHub 使用
Git 提交可以使用 GPG 密钥签名,增加 --show-signature 参数即可显示提交的签名信息。
未信任的公钥签名的提交显示红色提示。

已信任的公钥签名的提交显示青色提示。

Git 设置
密钥的 UID 需要包括 Git 使用的邮箱。
首先告诉 Git 使用的密钥。[3]
1 | |
然后设置提交时使用 GPG 签名。
1 | |
信任 GitHub 公钥
使用以下命令导入并信任 GitHub 的公钥。[11]
1 | |
上传公钥到 GitHub
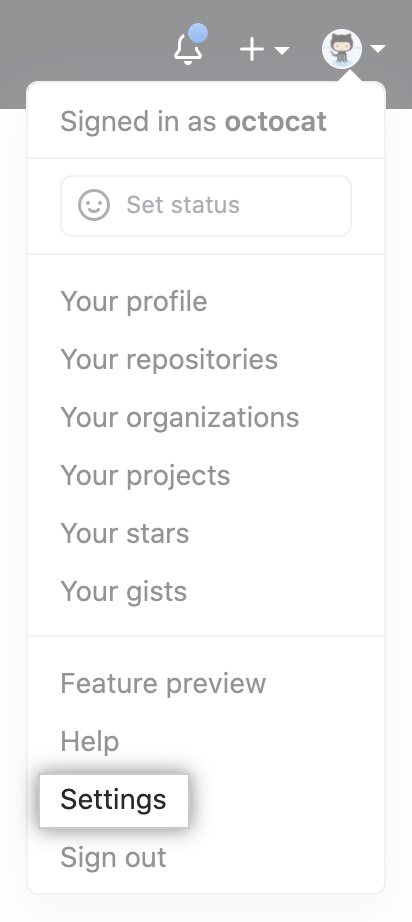
打开 GitHub 设置,找到 SSH and GPG Keys。[2]
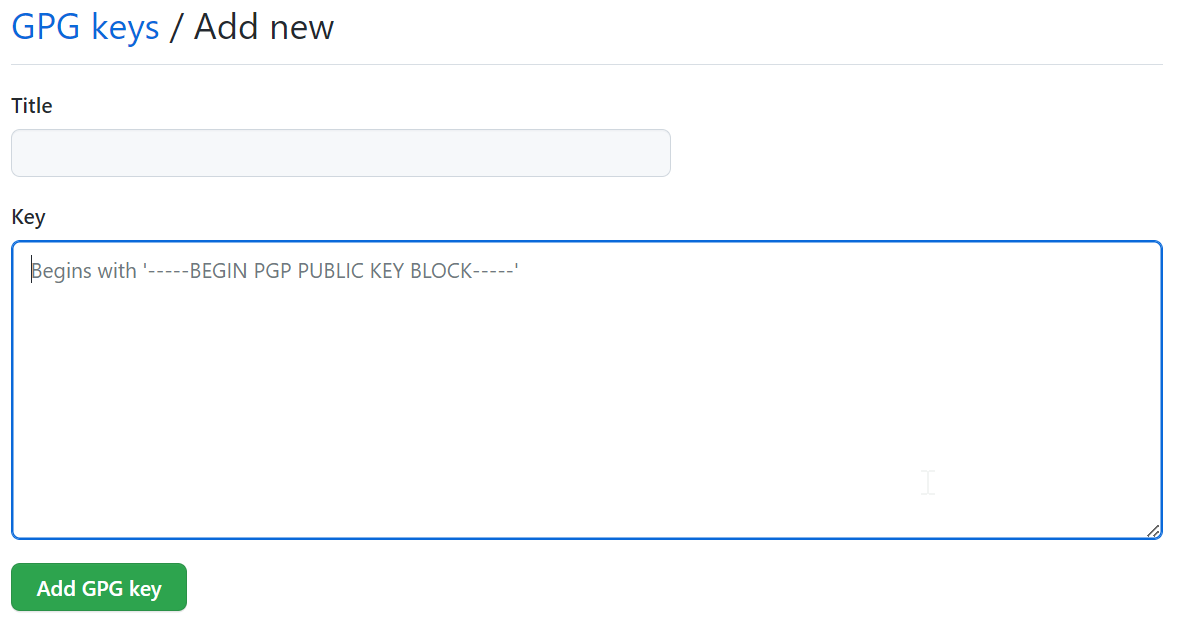
点击 New GPG Key,把导出的公钥复制进去。

此时签名的提交在 GitHub 即可显示绿色的 Verified。
References
- About commit signature verification. GitHub Docs. [2022-06-06]. (原始内容存档于2022-06-06) ↩
- Adding a new GPG key to your GitHub account. GitHub Docs. [2022-06-06]. (原始内容存档于2022-05-31) ↩
- Telling Git about your signing key. GitHub Docs. [2022-06-06]. (原始内容存档于2022-05-29) ↩
- 阮一峰. GPG入门教程. 阮一峰的网络日志. 2013-07-12 [2022-06-06]. (原始内容存档于2022-06-01) ↩
- 嗯了个踢. 简明 GPG 概念. 知乎. 2020-05-02 [2022-06-06]. (原始内容存档于2022-06-06) ↩
- Konstantin Ryabitsev. 用 PGP 保护代码完整性(一): 基本概念和工具. Linux 中国. 2018-04-08 [2022-06-06]. ↩
- Konstantin Ryabitsev. 用 PGP 保护代码完整性(二):生成你的主密钥. Linux 中国. 2018-04-09 [2022-06-06]. ↩
- UlyC. 2021年,用更现代的方法使用PGP(上). UlyC - C的博客. 2021-01-13 [2022-06-06]. (原始内容存档于2022-06-06) ↩
- UlyC. 2021年,用更现代的方法使用PGP(中). UlyC - C的博客. 2021-01-18 [2022-06-06]. (原始内容存档于2022-06-06) ↩
- UlyC. 2021年,用更现代的方法使用PGP(下). UlyC - C的博客. 2021-01-26 [2022-06-06]. (原始内容存档于2022-06-06) ↩
- VonC. What is GitHub’s public GPG key?. Stack Overflow. 2022-03-02 [2022-06-06]. (原始内容存档于2021-11-23) ↩