Compiler Explorer(Godbolt)是如何工作的?
Compiler Explorer(Godbolt)是一个交互式在线汇编语言编译器,本文主要分享探索其原理的过程,并提取其开源代码实现了一个本地命令行版本。
什么是汇编
推荐阅读汇编语言入门教程 - 阮一峰的网络日志[1]了解汇编语言的基础知识。
样例代码
1 | |
Compiler Explorer 结果
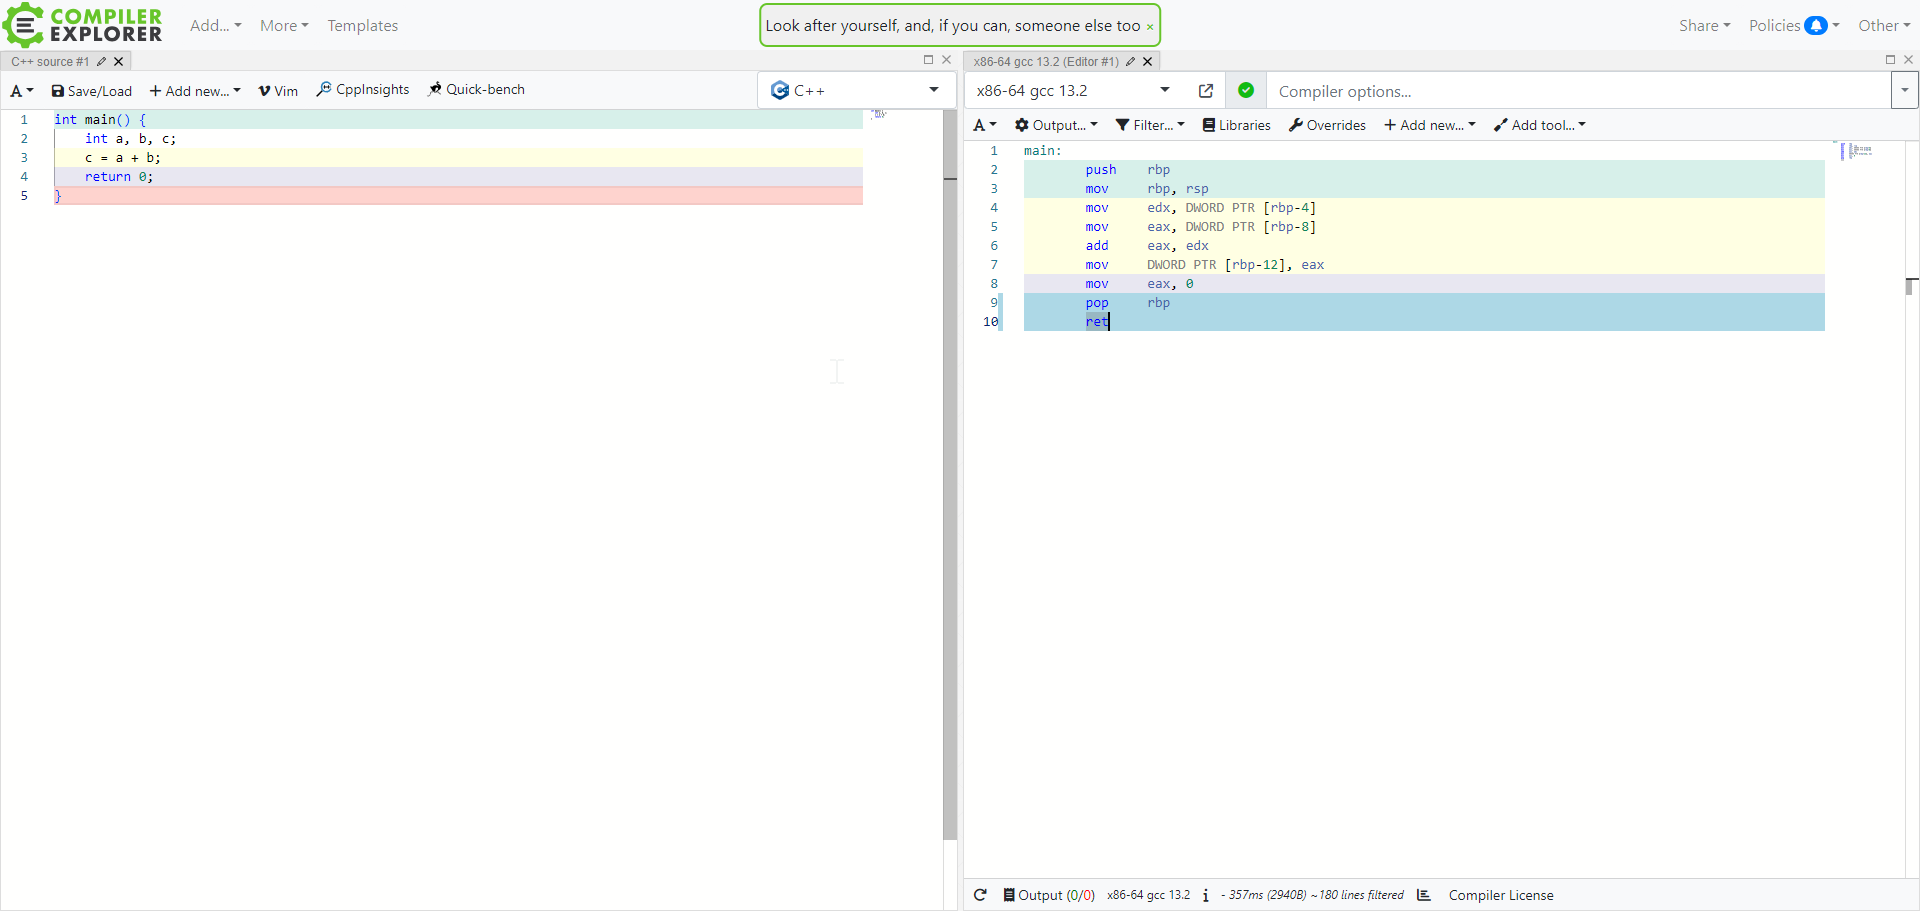
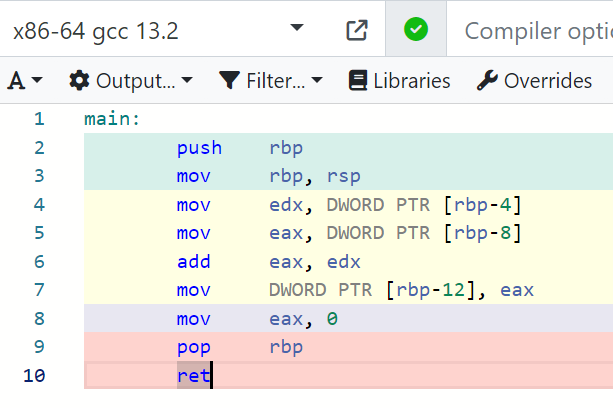
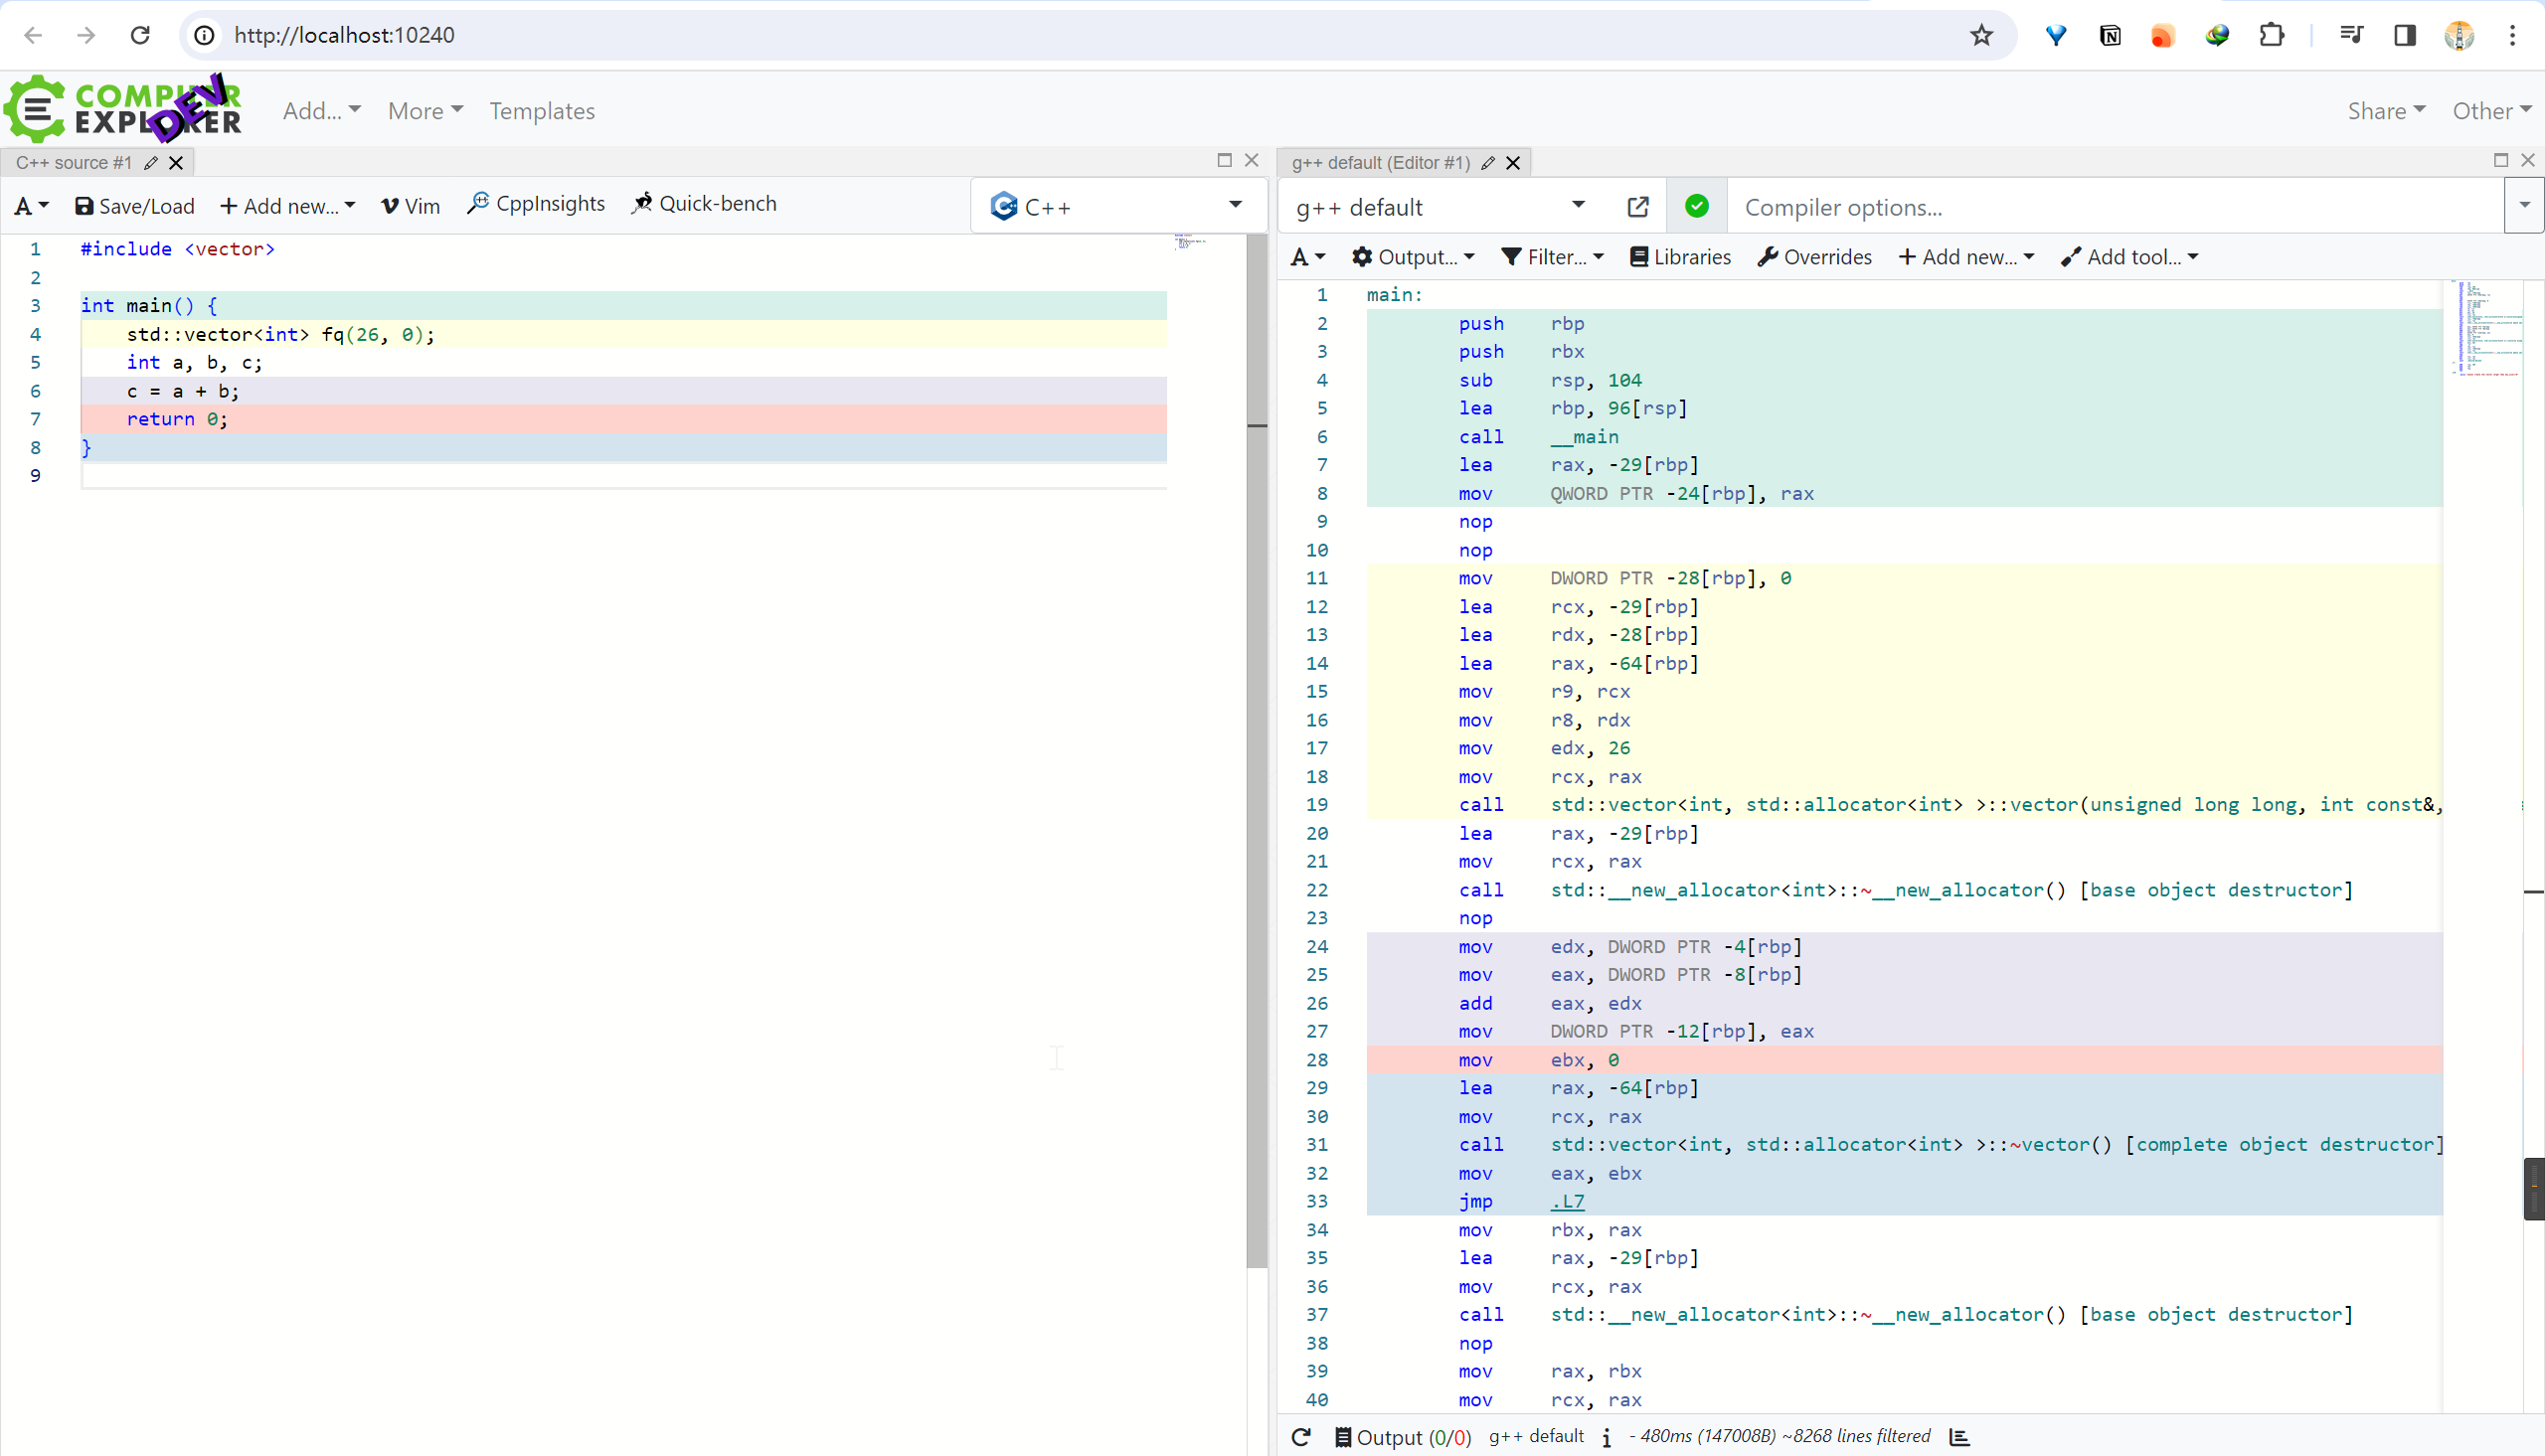
首先使用 Compiler Explorer 编译上述代码,得到如下结果,确定我们的目标:
GCC 编译到汇编
1 | |
1 | |
文件清理及优化参数
本文主要分享探索过程,这部分实际上并不会在最后用到,可以考虑跳过。
.seh_* 指令
首先移除 .seh_*,这些是 MASM 的帧处理伪代码 gas 的实现[4]。添加参数 -fno-asynchronous-unwind-tables。
1 | |
指定输出文件
使用 -o 参数指定输出文件。
1 | |
Intel 风格
在 Compiler Explorer 上的汇编代码没有 %,而直接编译的结果有大量的 %,搜索发现这是 AT&T 风格和 Intel 风格的区别。
更新命令参数:
1 | |
移除 .ident
以 -fno-asynchronous-unwind-tables 为线索搜索,找到了 GCC 文档,发现 -fno-ident 参数可以移除 .ident[5]。
1 | |
当前的成果
此时已经和 Compiler Explorer 的输出基本一致了。
1 | |
深入 Compiler Explorer 原理
真的是 GCC 在过滤吗?
在 Compiler Explorer 上,有一个过滤器选项,不选择过滤时,结果有着巨大的差异。
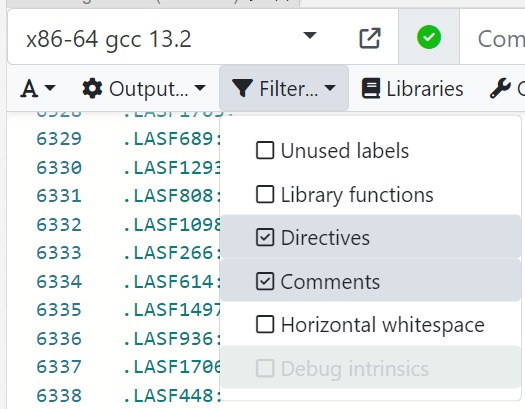
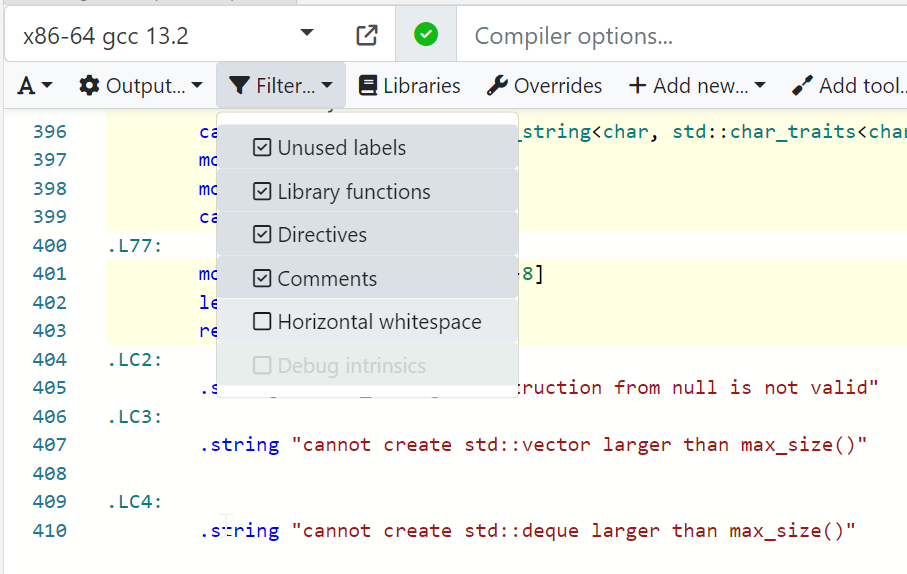
于是我怀疑是否这个过滤不是 GCC 编译器的功能,因为完整的编译流程后产生的二进制文件需要可执行,是必须包含库函数等文件的,是不是 Compiler Explorer 实际上在编译后过滤了一遍,实现的这个效果。
例如上文的简单代码,使用以下命令查看预处理后的文件是这样的:
1 | |
1 | |
而添加 #include <stdio.h> 后,预处理后的文件变为了一千多行,stdio 中的内容也被包含了进来,于是编译器会将这部分也编译为汇编代码,以便可执行文件包含所有的库。
搜索 Compiler Explorer 原理
Compiler Explorer 曾经名为 godbolt,直接检索 godbolt 如何过滤汇编代码:
. 2019-05-21. [Archived](https://web.archive.org/web/20231211162509/https://stackoverflow.com/questions/56245402/step-into-standard-library-call-with-godbolt/56246283#56246283) on 2023-12-11. Retrieved 2023-12-11.">[6]</span></a></sup><sup id="fnref:7" class="footnote-ref"><a href="#fn:7" rel="footnote"><span class="hint--top hint--rounded" aria-label="Peter Cordes. [How to remove "noise" from GCC/clang assembly output?](https://stackoverflow.com/questions/38552116/how-to-remove-noise-from-gcc-clang-assembly-output/38552509#38552509). 2016-01-24. [Archived](https://web.archive.org/web/20231211162508/https://stackoverflow.com/questions/38552116/how-to-remove-noise-from-gcc-clang-assembly-output/38552509#38552509) on 2023-12-11. Retrieved 2023-12-11.">[7]</span></a></sup>](https://picture.zhanganzhi.com/2023/12/11/kdrp4ee.png)
然后找到了 Compiler Explorer 作者 Matt Godbolt 的演讲:CppCon 2017: Matt Godbolt “What Has My Compiler Done for Me Lately? Unbolting the Compiler’s Lid”
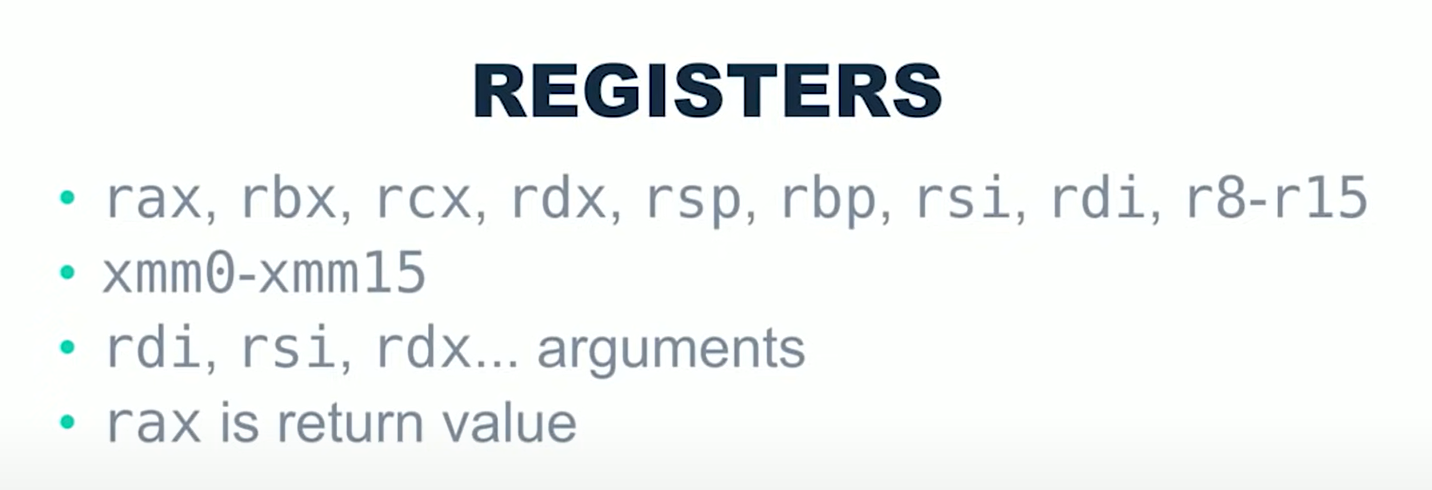
Matt Godbolt 的演讲
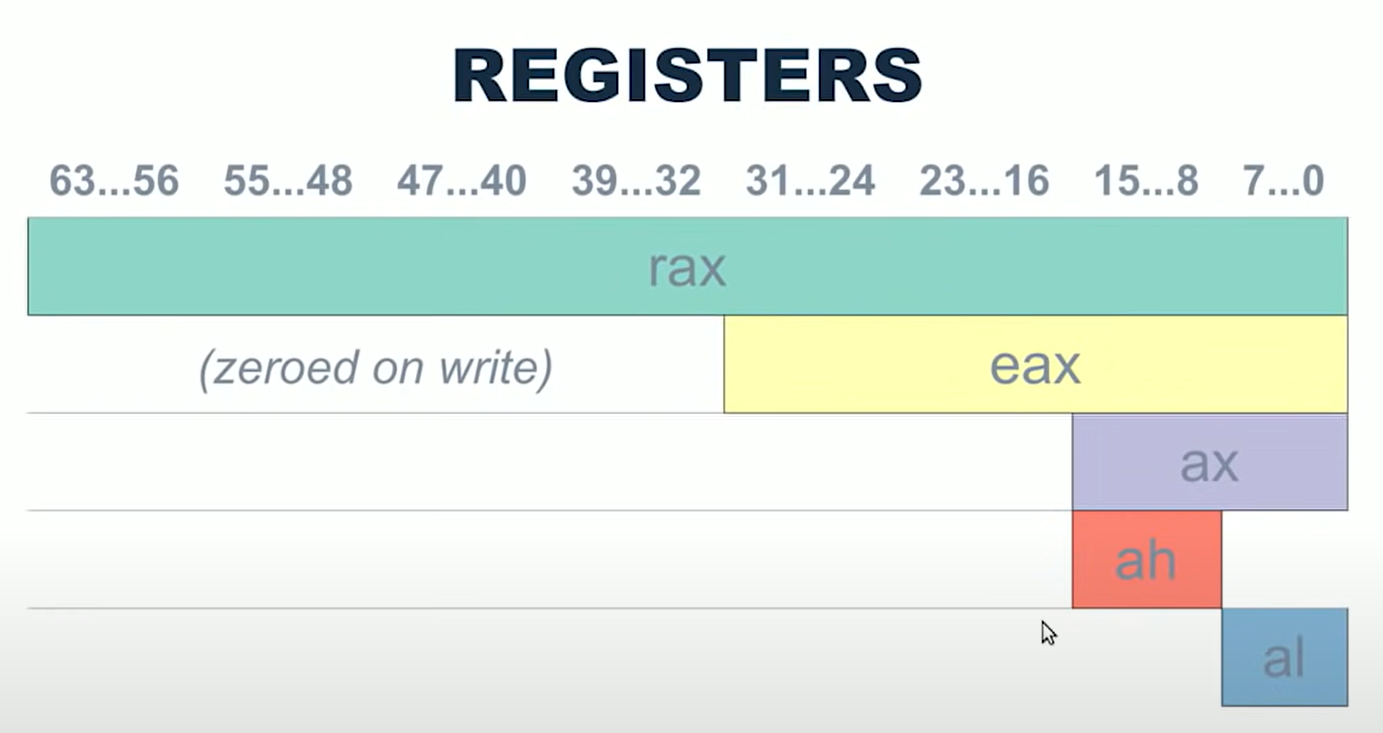
这个演讲详细解释了寄存器的区别、如何保持从 8 位处理器到现在 64 位的兼容、Intel 语法和 AT&T 语法、Compiler Explorer 原理……
我个人强烈推荐这个演讲给计算机本科的同学,这对于了解 C 编译器的过程、汇编语言的基本知识、寄存器、编译器的优化策略等都有很大的帮助,绝对值得花费 2-3 小时的时间学习和理解这个演讲。
其中的每一个细节的知识点都可以发散出非常多的内容,例如计算机从 8 位发展到 64 位的历史和变化、汇编语言基础、编译器的优化(他演示了几种情况,展示了编译器如何优化它们)、linux 命令、Docker、云服务器实践和虚拟机……
学习这个演讲的内容,并完全消化,无论对于目标是工业界还是学术界的学生都是有益的。
过滤以点开头的行和 C++ 符号
在演讲中,我注意到了以下命令:
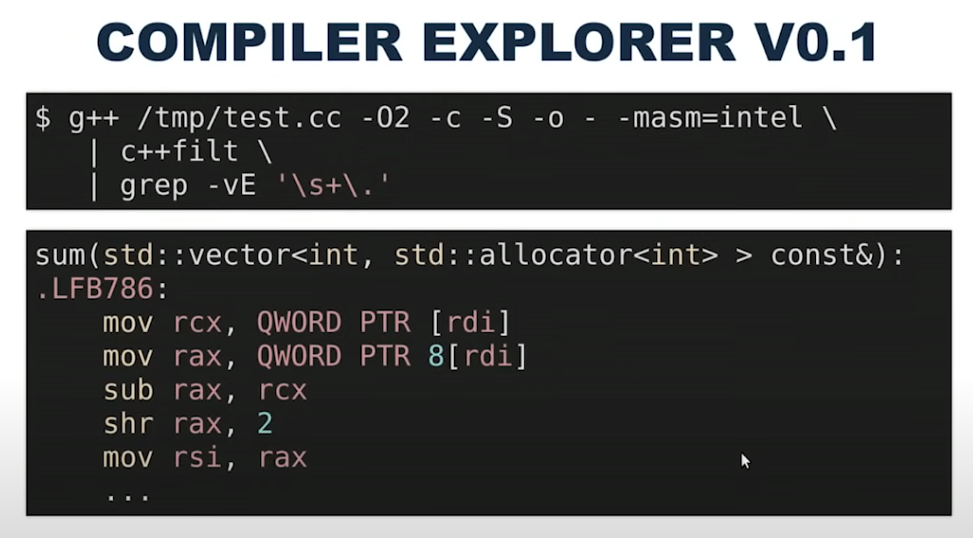
1 | |
参数的含义如下:
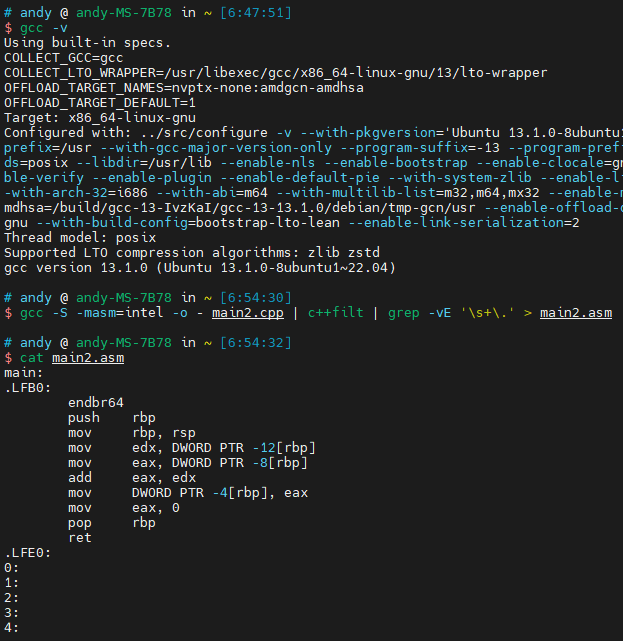
-O2优化等级-c仅编译和汇编,不链接,但实际上我们不需要 object 文件-S编译,获得汇编代码-o -输出到命令行-masm=intel使用 intel 语法c++filt过滤 C++ 的符号grep -vE '\s+\.过滤以点开头的行
c++filt 的作用是过滤 C++ 的符号,因为 C++ 有函数重载,编译器会对此处理,而我们希望获得人类可读的函数名,例如:
1 | |
借鉴这个命令,优化我们的编译命令:
1 | |
此时的编译结果如下:
1 | |
命令参数的问题
由此我们也可以看出来 -fno-asynchronous-unwind-tables 和 -fno-ident 其实并不需要,反而可能会过滤掉我们希望保留的内容,进一步修改命令:
1 | |
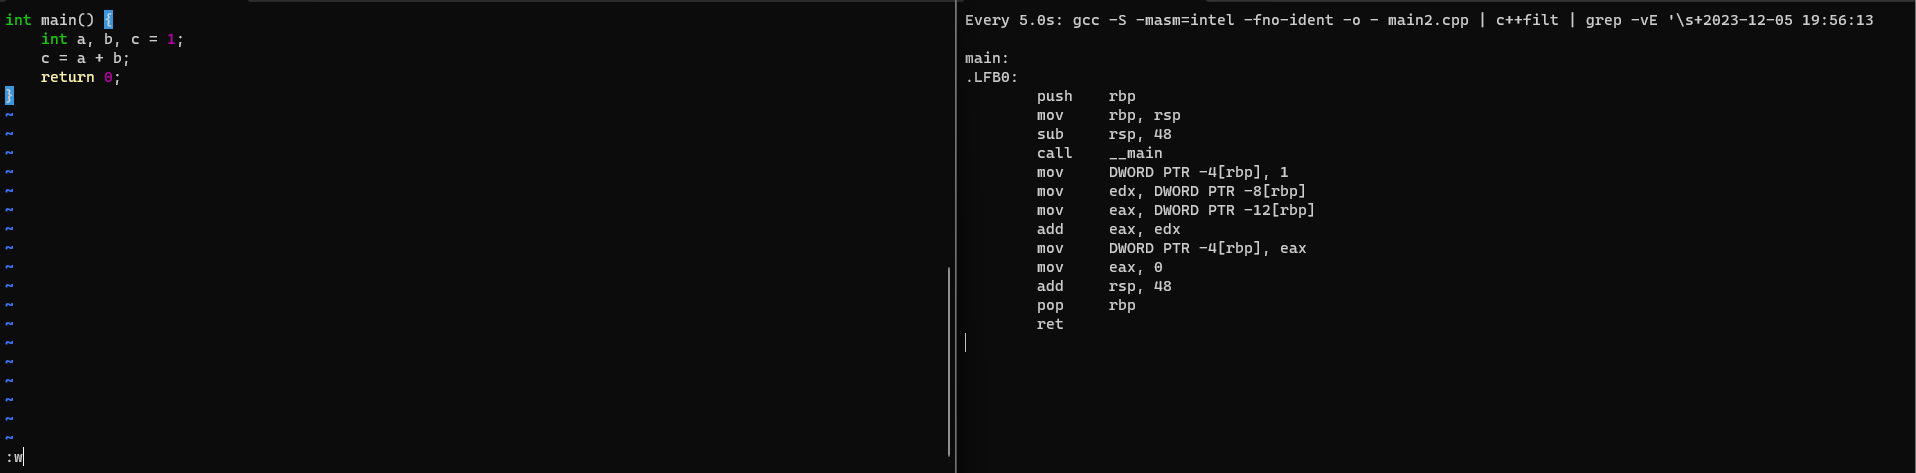
Matt 的简单方案
有了这样的指令,Matt 提到了他以前使用的简单方案:基于 Linux 的 watch 命令实现定时执行编译命令,然后用 tmux 一边开 vim 一边 watch,实现了简单的 Compiler Explorer。我简单复现了他的方案:
简单讨论平台差异
当前的编译结果是这样的,其中有几行依然与 Compiler Explorer 上的代码不同(绿色为我的结果,红色为 Compiler Explorer 的):
1 | |
我考虑是否有可能是有平台的区别,于是在 AMD 平台,Ubuntu 系统,使用同样的 GCC 13 编译,结果如下:
可以看到确实对 rsp 的无用操作和 call __main 消失了,但是在使用指针变量时仍然有区别。
指针语法
Compiler Explorer 的编译结果中的引用格式是 [rbp-4],而我们的是 -4[rbp]。
一般而言,-4(%rbp) 是 AT&T 语法,[rbp-4] 是 Intel 语法,但是在我们的编译结果中,Intel 语法产生了 -4[rbp] 的结果。
我们先放下这些平台差异,继续探索 Compiler Explorer 的原理。
Compiler Explorer 原理
深入源码
现在我们的代码已经和 Compiler Explorer 上的代码基本一致了,我们只需要做两件事:过滤 Library functions 和 Unused label。
演讲中并没有提到是怎么过滤的,于是我查找了 Compiler Explorer 的源码:https://github.com/compiler-explorer/compiler-explorer
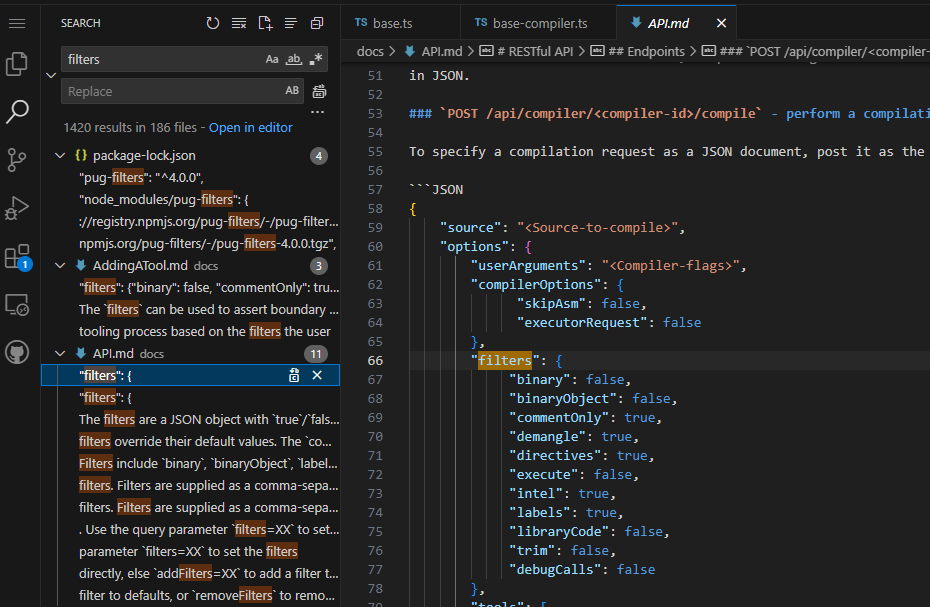
首先搜索 filters,在 API 文档中找到了所有可用的 filters:
继续搜索 libraryCode,找到了这段代码,看起来是生成一个过滤用的脚本。
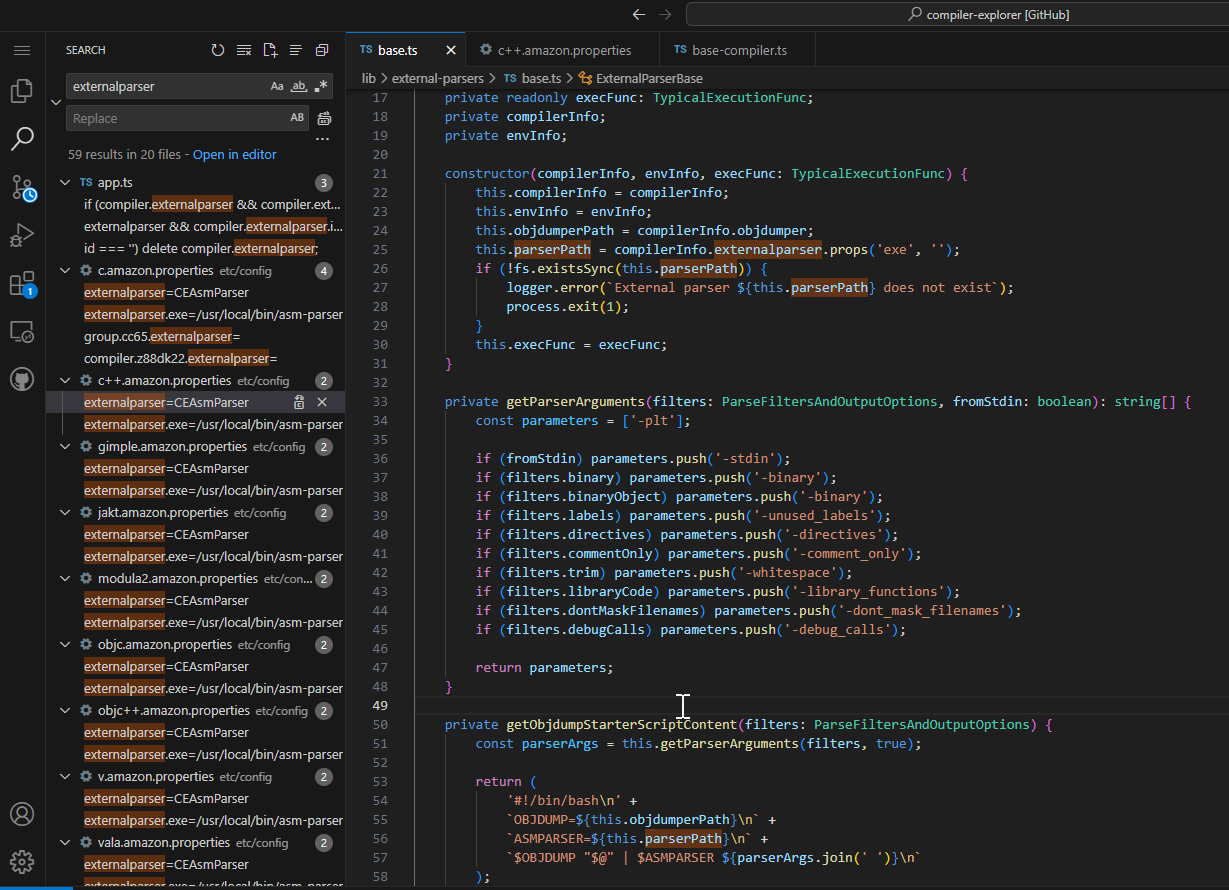
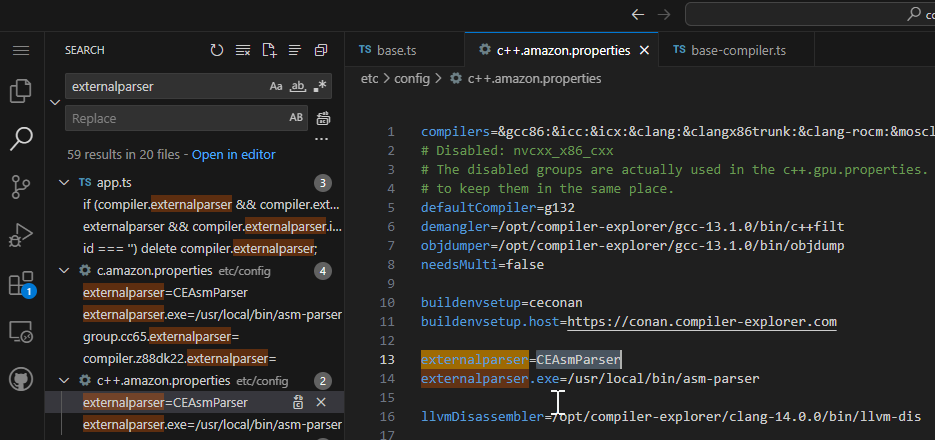
objdump,是将目标文件反汇编的工具,而 ASMPARSER 之前并没有见过,似乎是汇编语言的解析器,于是继续搜索 externalparser,找到了这个软件名:
更新测试代码
为了测试过滤库函数的能力,我们将测试代码更新为:
1 | |
asm-parser
随后找到了该作者的 asm-parser 软件,使用 C++ 编写:
https://github.com/compiler-explorer/asm-parser
这个软件只编译了 Linux 平台,我尝试在 Windows 编译没有成功,在 Linux 执行以下命令:
1 | |
编译后的结果如下:
1 | |
Compiler Explorer 上的结果:
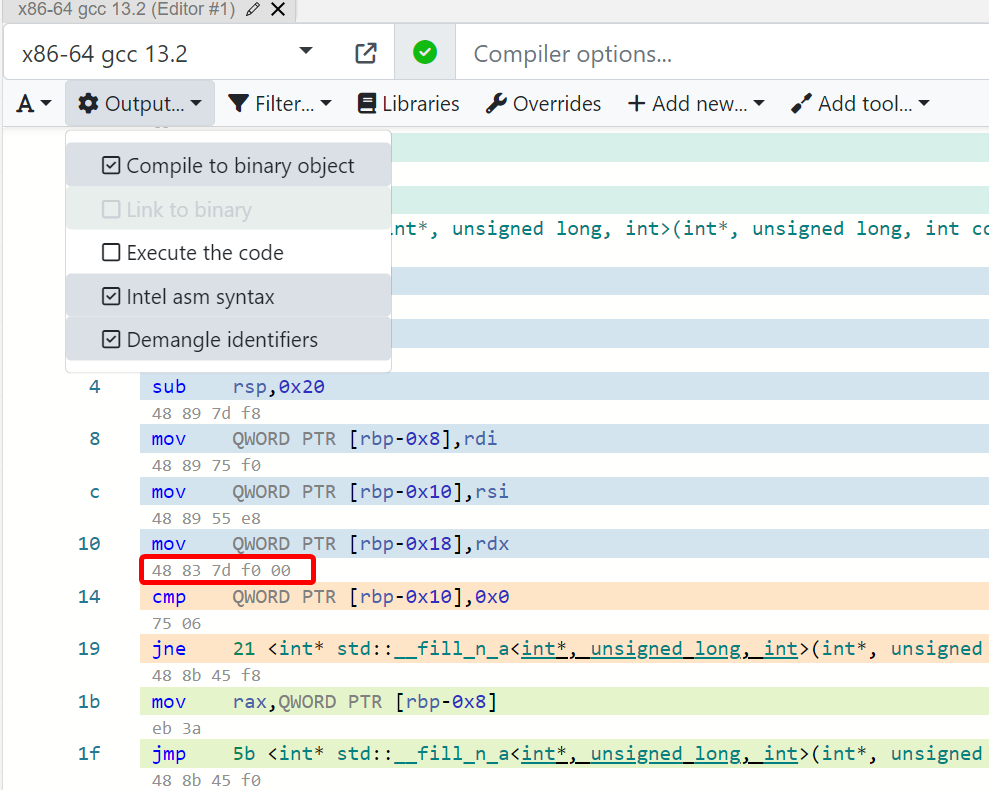
1 | |
该软件的 -library_functions 参数完全删除了所有的库函数,并不是未使用的库函数,而且我发现在 Compiler Explorer 上可以选择 binary 选项,即为先编译到二进制对象文件再编译到汇编,还是直接使用源文件编译到汇编,而这个软件可能版本有些落后,且只能处理二进制文件。
回到源码
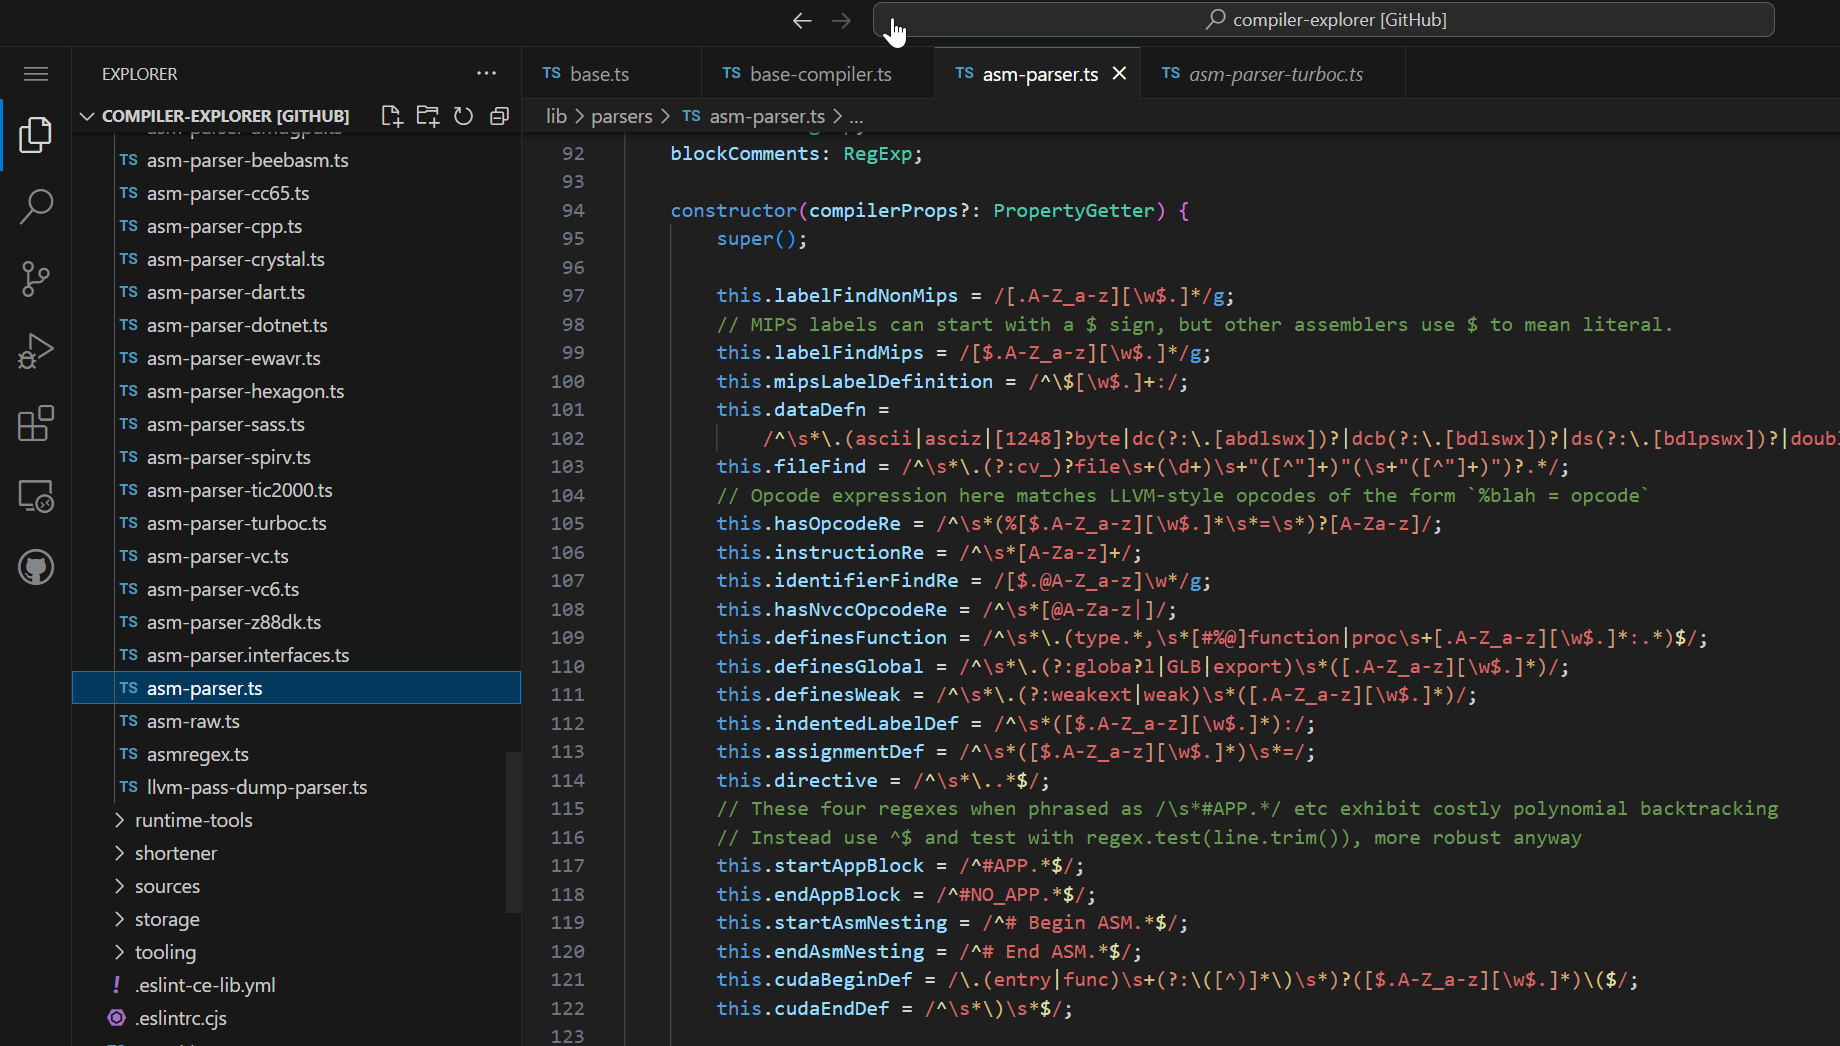
再次回到 Compiler Explorer 的源码,找到了一个名为 asm_parser.ts 的文件,其中有大量的正则表达式,这个大概就是该平台目前实际上正在使用的过滤器。这也进一步印证了我的想法,过滤并不是 gcc 的参数,而是在编译后再过滤。
我将源码下载下来在本地运行,尝试查看是否会在控制台输出使用的命令,但是并没有。
提取源码组合本地程序
提取过滤的 js 代码
于是我计划将过滤的 js 代码提取出来重新封装,这样就可以在本地运行了。
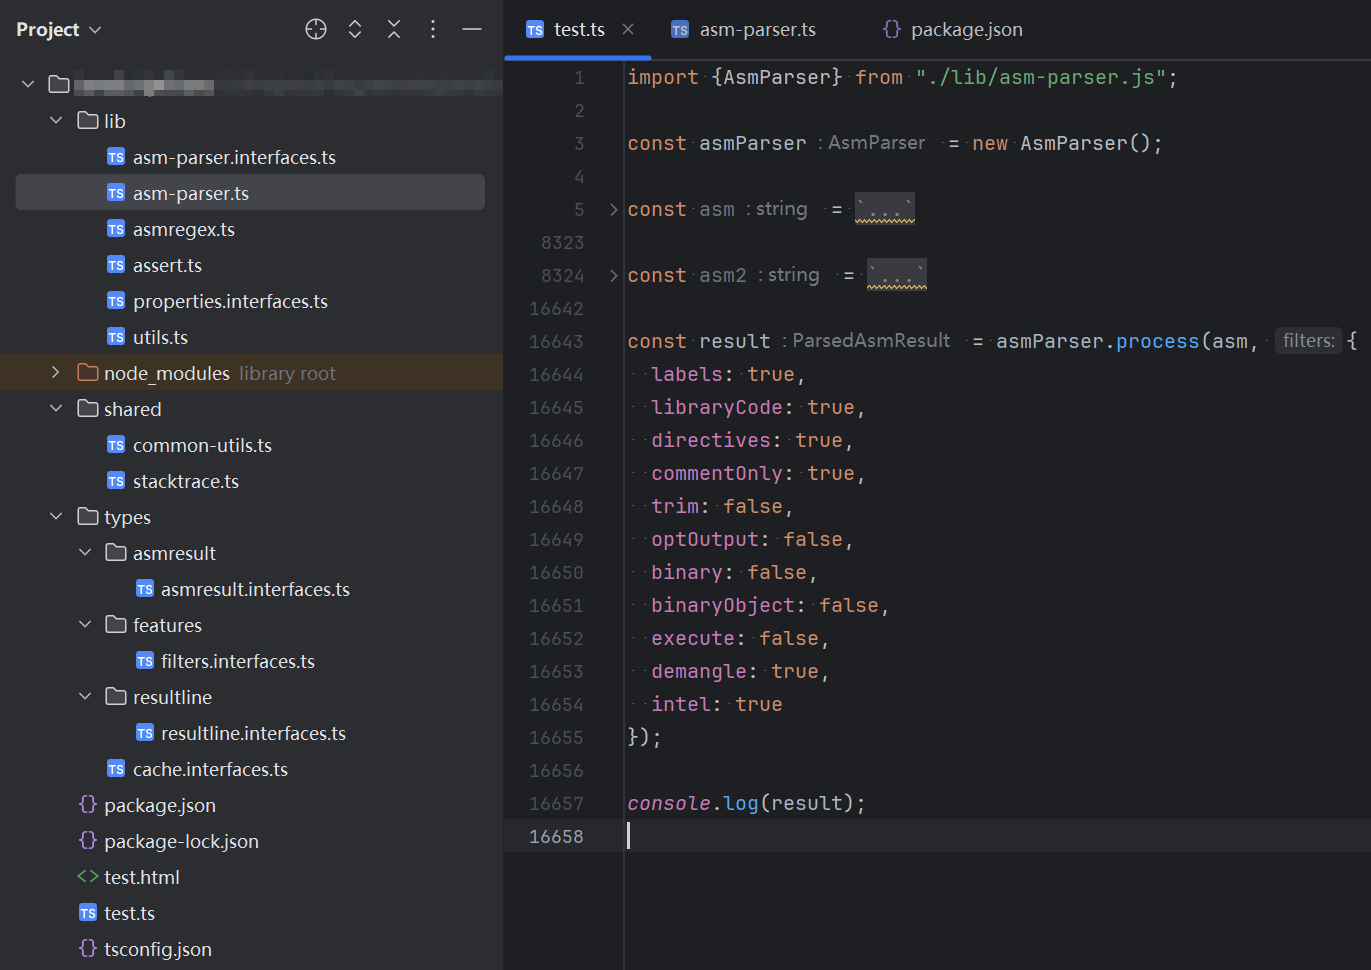
在上文提到的 asm_parser.ts 文件中,最后两个函数似乎是处理二进制和非二进制汇编的函数。
1 | |
接下来就很简单了,打断点调试,查看方法参数:
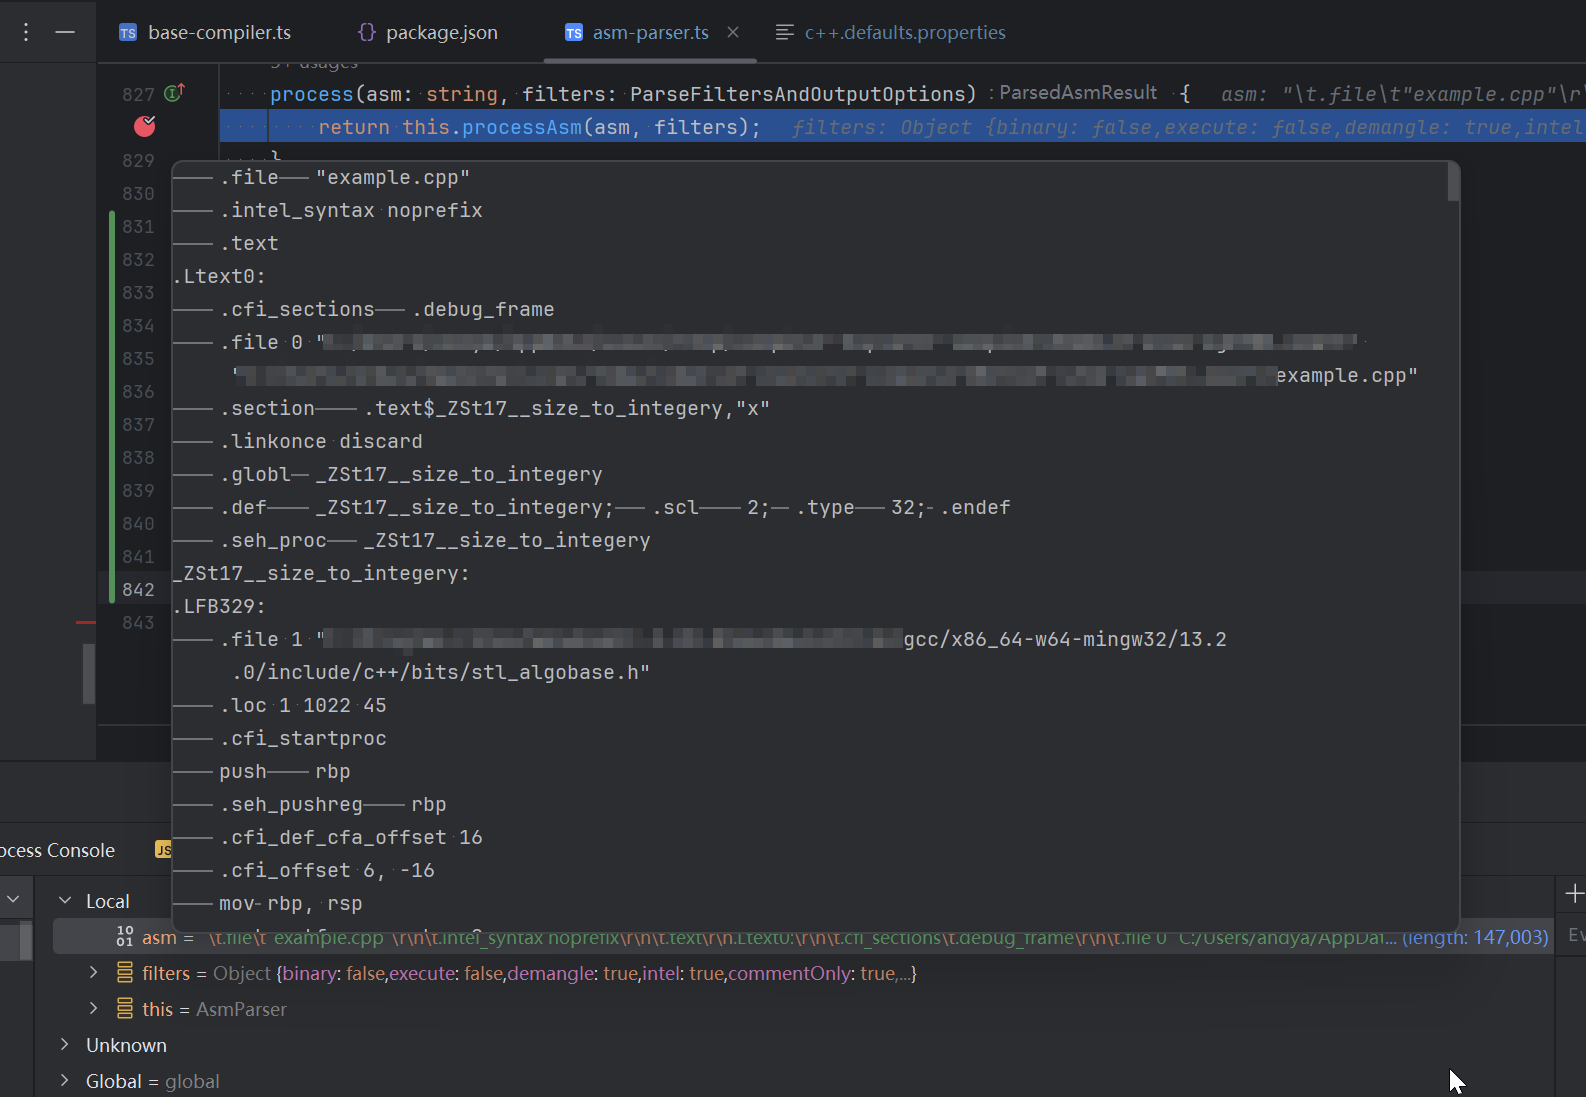
asm 是汇编的原文,filter 是个集合了过滤选项的对象。
根据这里的原文,知道了实际的编译参数是这样的:
1 | |
添加了 -g 参数,这是为了在汇编代码中添加调试信息,我猜测 c++filt 会在之后使用。
我将 asm_parser.ts 和需要的其他文件提取出来,并写了一个主文件。
根据之前 C++ 版 asm-parser 的文档,过滤库函数是基于文件路径的,文件名必须是 example.cpp 才可以被保留,否则主文件会被当做库文件被过滤。源码中的这个正则展示了这一点:
1 | |
JSON 转纯文本
当前的输出还是 JSON 的格式,我希望转为纯文本,于是撰写了一个函数使其输出纯文本。
1 | |
c++filt
再使用 c++filt 过滤 C++ 符号,就可以得到和 Compiler Explorer 几乎一样的结果了。
符号后的描述
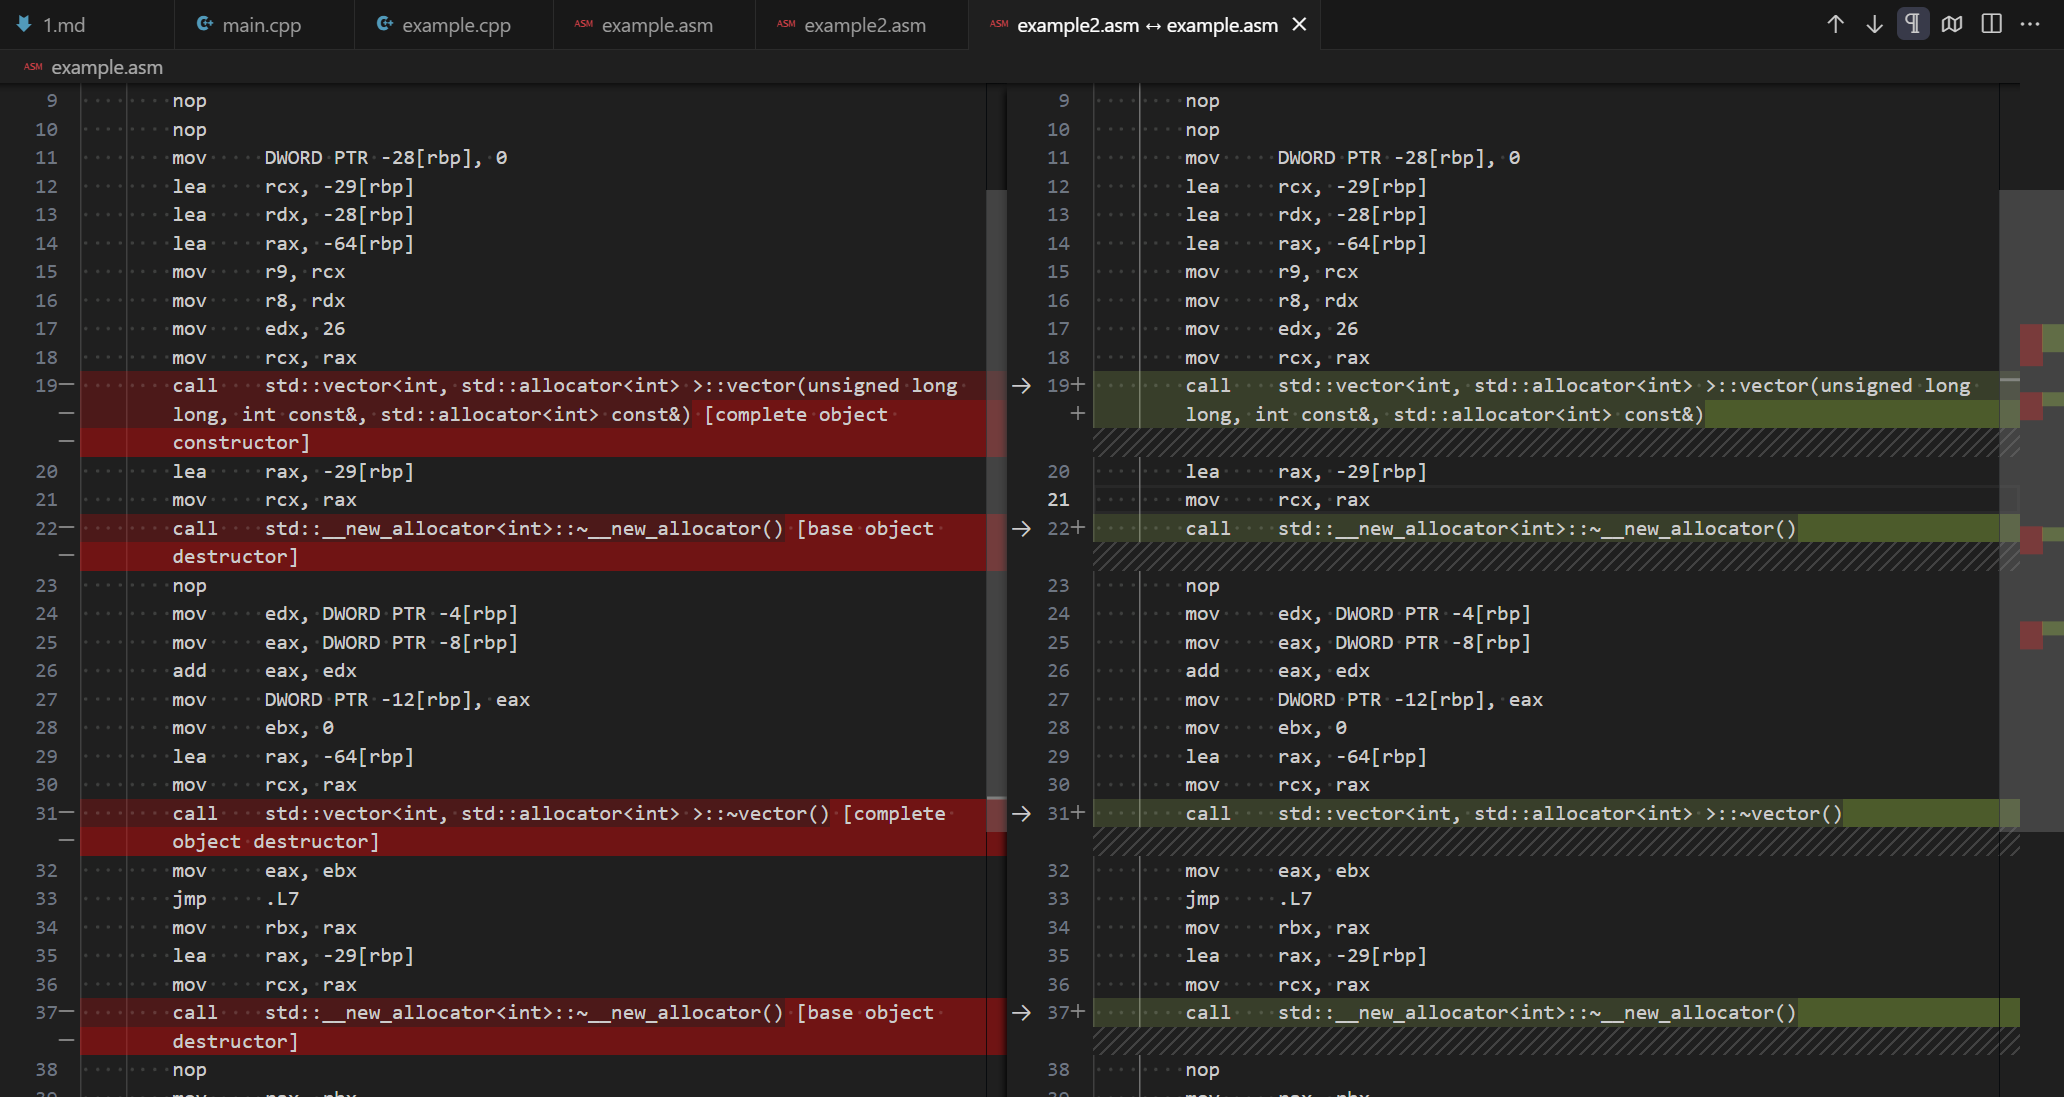
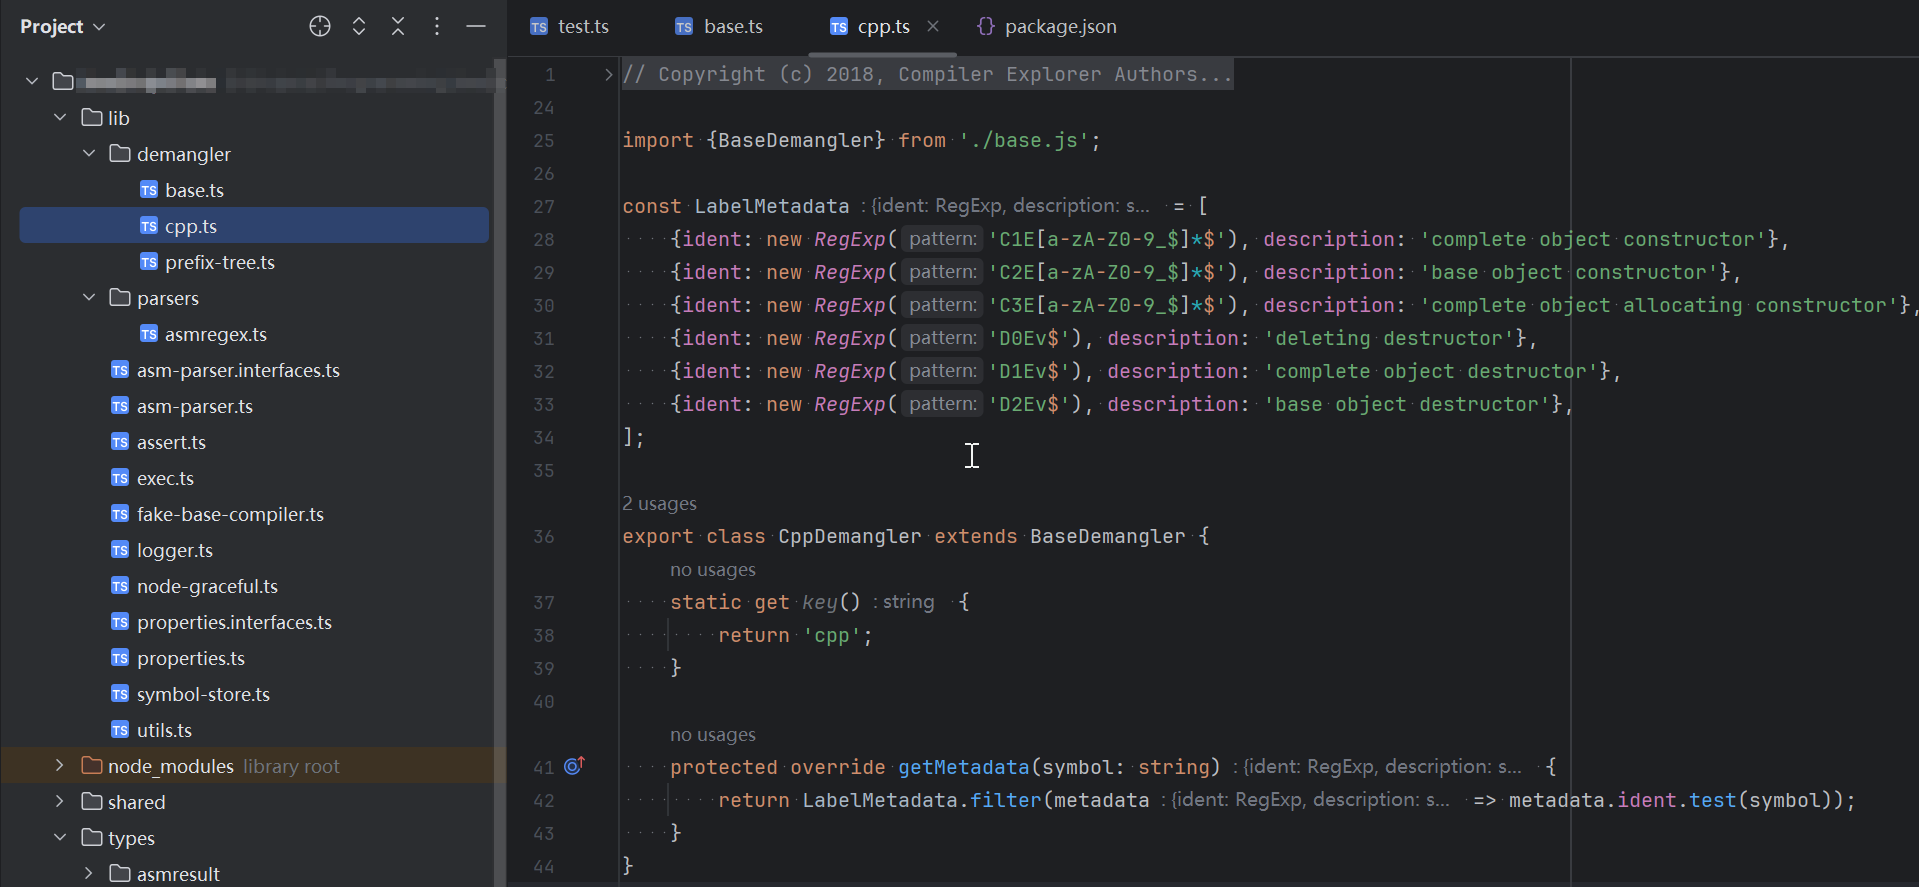
上图的对比可以看出,Compiler Explorer 的输出在调用函数后使用方括号补充了一段描述。再次阅读源码后,我将 CppDemangler 提取了出来。
至此,输出与 godbolt 上的输出完全一致。
Typescript 版 asm-parser
完善命令行接口
最后做一些小修改,完善命令行接口,从 stdin 读取汇编代码,输出到 stdout。
1 | |
1 | |
再测试,在同一台机器上,输出结果完全一致。
然后再使用 https://github.com/vercel/pkg 将 ts 编译为二进制文件,这个工具可以同时编译到三个平台。
1 | |
我将这个项目开源在了 GitHub 上,欢迎大家使用和提出建议:https://github.com/AnzhiZhang/asm-parser
至此,完整的编译命令是:
1 | |
源码对应关系和上色
还有最后一个小问题,Compiler Explorer 上的汇编代码是有上色的,用于标记和源码的对应关系,而我们的没有。查看接口的返回数据,可以发现前端收到的是 JSON 格式的,每一行都有对应源码的行号,这个功能是前端实现的。
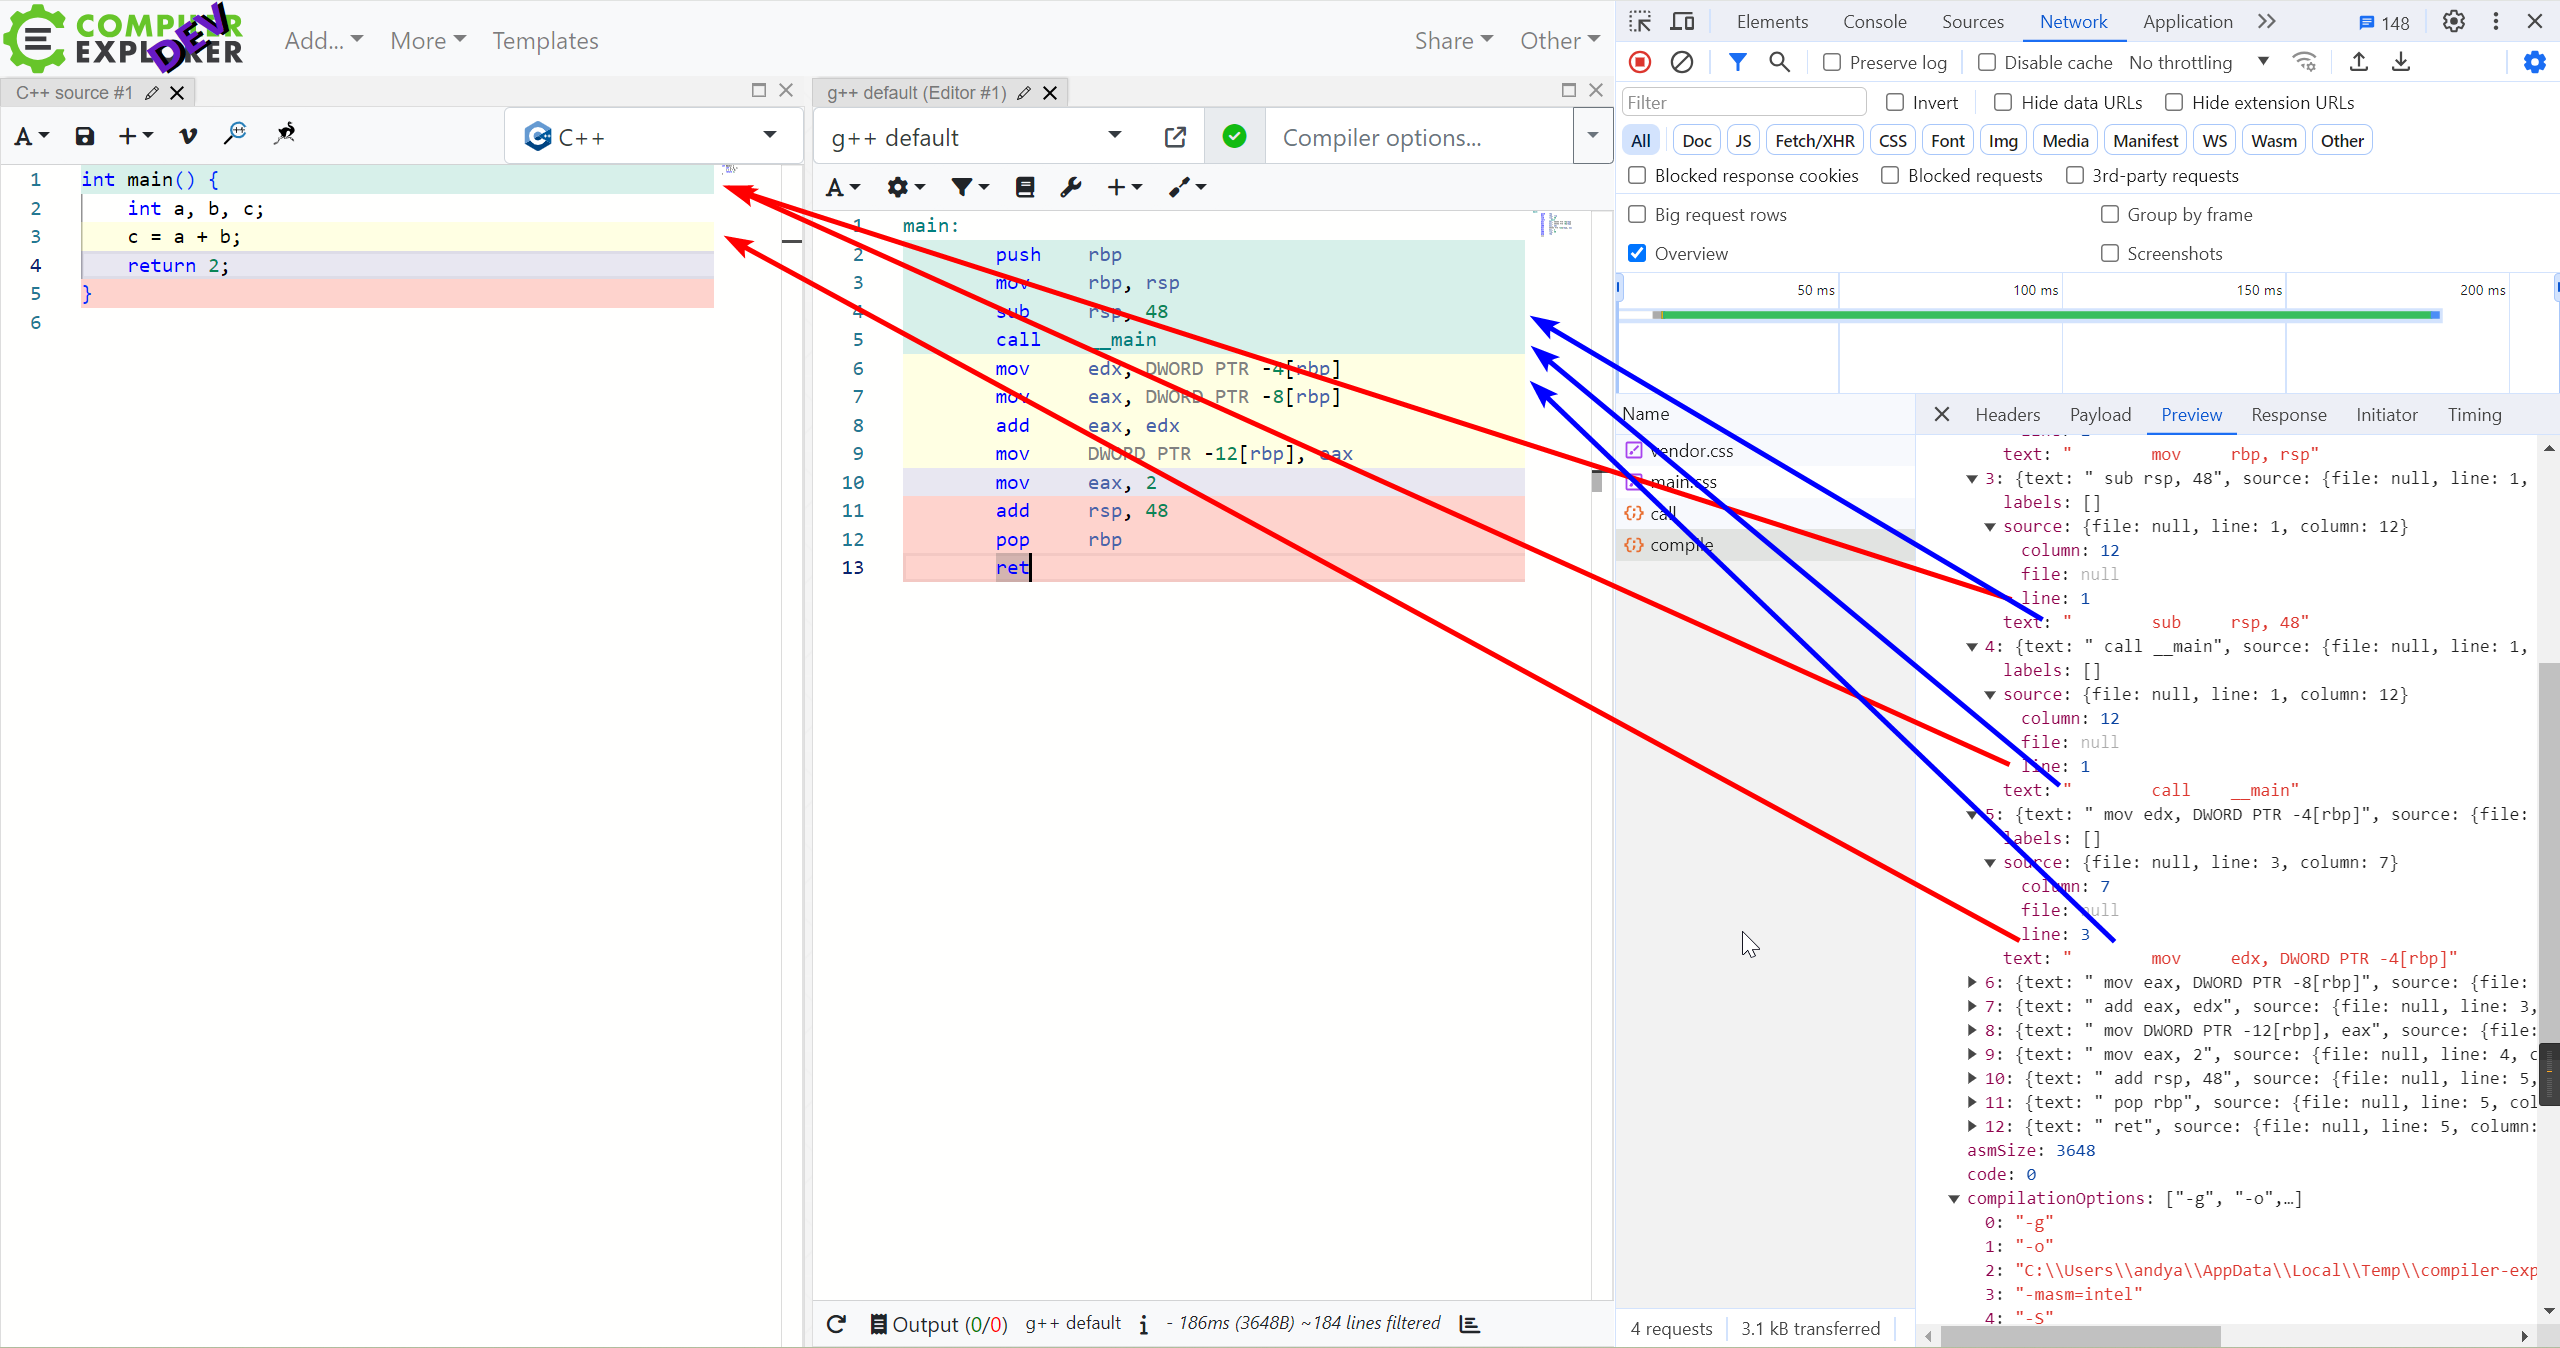
只需要在使用 asm-parser 时移除 --outputtext 参数,就可以得到带有源码行数对应关系的数据了。
1 | |
其他平台
我们还希望在 armv8 和 riscv 平台上获得过滤的汇编代码,下文简短介绍了实现方式。
为方便演示,我仅用以下代码示例:
1 | |
为了方便交叉编译,我们使用 clang,添加 -target <triple> 即可指定目标平台[8]:
The triple has the general format
<arch><sub>-<vendor>-<sys>-<env>, where:
arch=x86_64,i386,arm,thumb,mips, etc.sub= for ex. on ARM:v5,v6m,v7a,v7m, etc.vendor=pc,apple,nvidia,ibm, etc.sys=none,linux,win32,darwin,cuda, etc.env=eabi,gnu,android,macho,elf, etc.
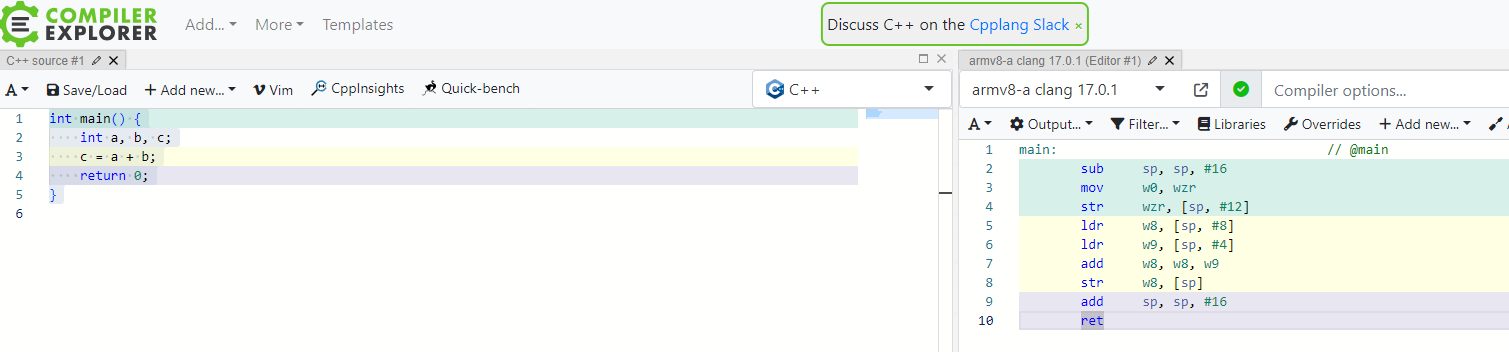
armv8
1 | |
编译结果如下:
1 | |
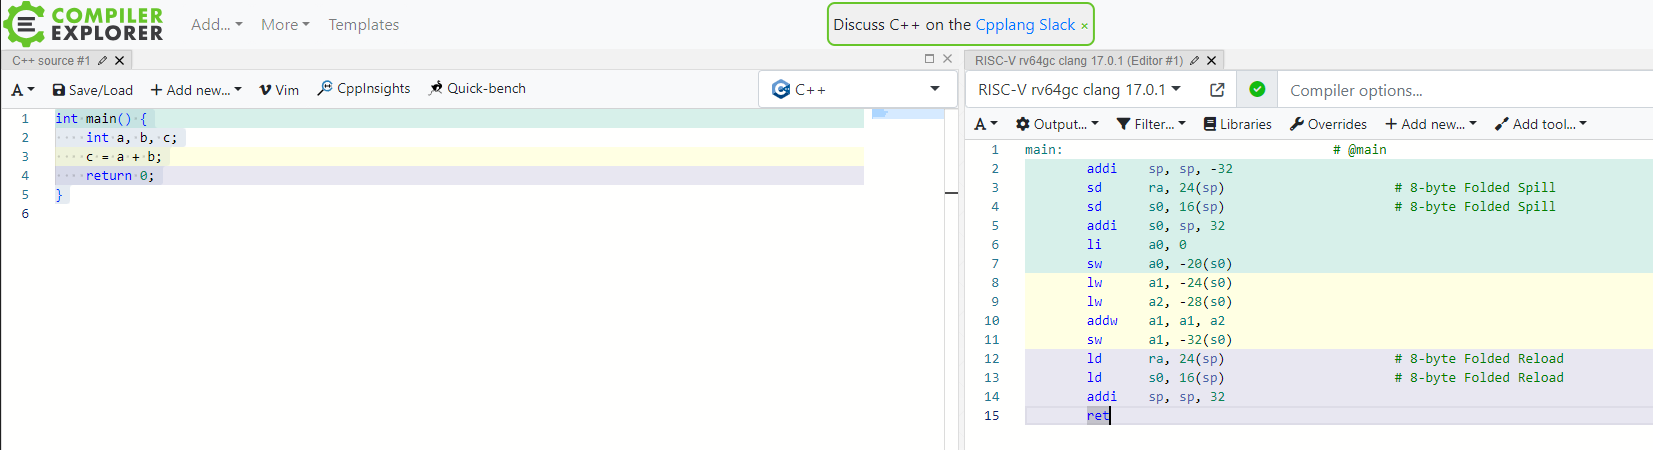
riscv
1 | |
编译结果如下:
1 | |
References
- 阮一峰. 汇编语言入门教程 - 阮一峰的网络日志. 2018-01-21. Archived on 2023-12-11. Retrieved 2023-12-11. ↩
- Antoine Pelisse. Does C++ compile to assembly?. 2011-01-24. Archived on 2023-12-11. Retrieved 2023-12-11. ↩
- Andrew Edgecombe. How do you get assembler output from C/C++ source in GCC?. 2008-09-26. Archived on 2023-12-11. Retrieved 2023-12-11. ↩
- David Wohlferd. What are .seh_* assembly commands that gcc outputs?. 2016-07-04. Archived on 2023-12-11. Retrieved 2023-12-11. ↩
- Code Gen Options (Using the GNU Compiler Collection (GCC)). Archived on 2023-12-11. Retrieved 2023-12-11. ↩
- Peter Cordes. Step into standard library call with godbolt. 2019-05-21. Archived on 2023-12-11. Retrieved 2023-12-11. ↩
- Peter Cordes. How to remove “noise” from GCC/clang assembly output?. 2016-01-24. Archived on 2023-12-11. Retrieved 2023-12-11. ↩
- Cross-compilation using Clang — Clang 18.0.0git documentation. Archived on 2023-12-11. Retrieved 2023-12-11. ↩